<opencv>第十一课 轮廓检测

1
void cv::findContours(InputOutputArray image, OutputArrayOfArrays contours, OutputArray hierarchy, int mode, int method, Point offset = Point())

在二值图像中查找轮廓。从OpenCV3.2开始源图像不会这个函数被修改。

参数 含义
image 二值输入图像
contours 检测到的轮廓,每个轮廓都存储为点向量(例如 std::vector<std::vectorcv::Point >)
hierarchy 可选的输出向量(例如 std::vectorcv::Vec4i),包含有关图像拓扑的信息
mode 轮廓检索模式
method 轮廓近似方式
offset 每个轮廓点移动的可选偏移量
1
double cv::contourArea(InputArray contour, bool oriented=false)

计算轮廓区域

1
double cv::arcLength(InputArray curve, bool closed)

计算曲线长度或闭合轮廓周长

1
void cv::approxPolyDP(InputArray curve, OutputArray approxCurve, double epsilon, bool closed)

函数cv::approxPolyDP用另一个具有较少顶点的曲线/多边形来逼近一条曲线或多边形,以使它们之间的距离小于或等于指定的精度。

1
Rect cv::boundingRect(InputArray array)

计算并返回指定点集或灰度图像非零像素的最小上边界矩形。

1
void cv::drawContours(InputOutputArray image, InputArrayOfArrays contours, int contourIdx, const Scalar &color, int thickness = 1, int lineType = LINE_8, InputArray hierarchy = noArray(), int maxLevel = INT_MAX, Point offset = Point())

绘制轮廓轮廓或填充轮廓。如果厚度≥0,该函数在图像中绘制轮廓轮廓,如果厚度<0,则填充轮廓所包围的区域。

Point_< _Tp > tl() const
左上角

Point_< _Tp > br() const
右下角

1
2
3
4
5
6
7
8
//rect
template<typename _Tp> class cv::Rect_< _Tp >
typedef Rect_<int> cv::Rect2i
typedef Rect2i cv::Rect
//point
template<typename _Tp> class cv::Point_< _Tp >
typedef Point_<int> cv::Point2i
typedef Point2i cv::Point
cv::Rect_< _Tp >类属性 含义
height 矩形高度
width 矩形宽度
x 左上角的 x 坐标
y 左上角的 y 坐标
1
2
3
4
5
6
7
8
9
10
11
12
13
14
15
16
17
18
19
20
21
22
23
24
25
26
27
28
29
30
31
32
33
34
35
36
37
38
39
40
41
42
43
44
45
46
47
48
49
50
51
52
53
54
55
56
57
58
59
60
61
62
63
64
65
66
67
68
69
70
71
72
73
74
75
76
77
78
79
80
81
82
83
84
85
86
87
88
89
90
91
92
93
94
95
96
97
98
99
100
101
102
103
104
105
106
107
108
109
110
111
112
113
#include <opencv2/imgcodecs.hpp>
#include <opencv2/highgui.hpp>
#include <opencv2/imgproc.hpp>
#include <iostream>

using namespace cv;
using namespace std;

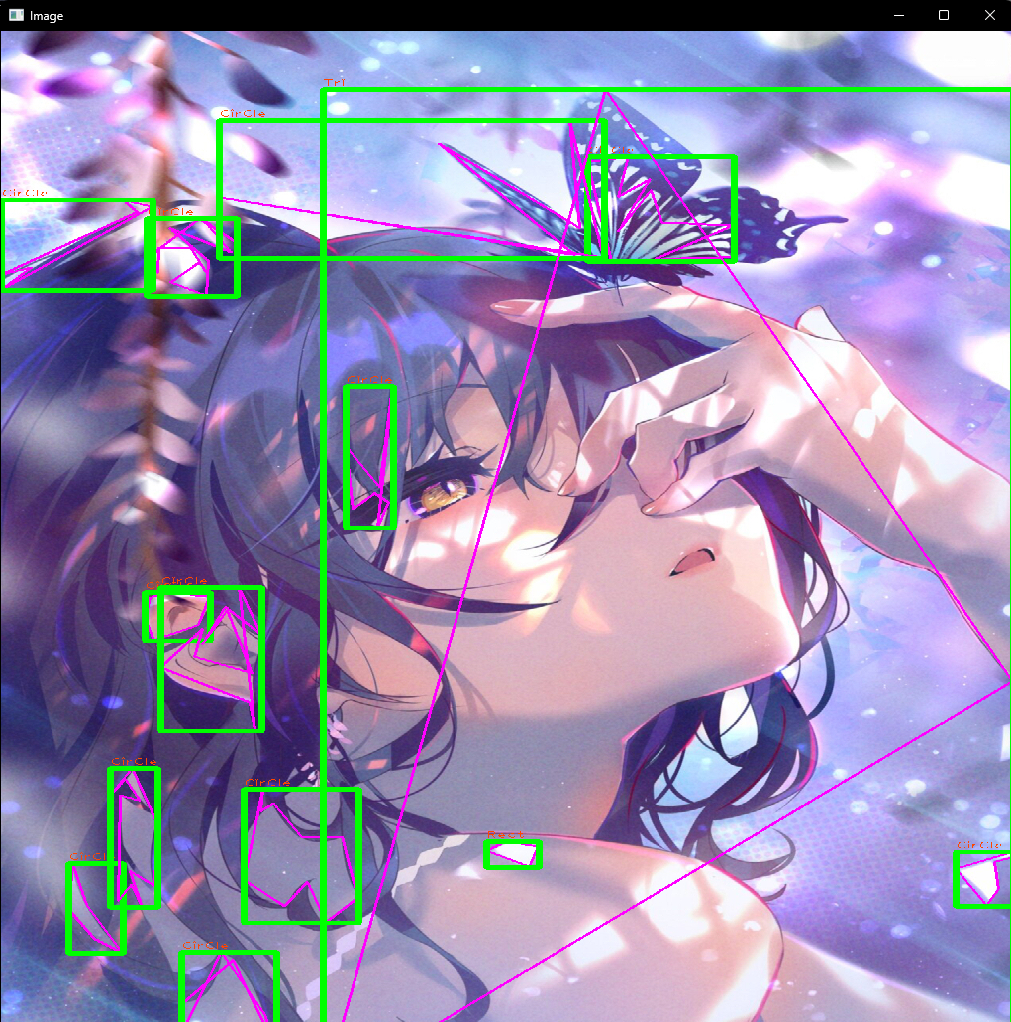
void getContours(Mat imgDil, Mat img) {

vector<vector<Point>> contours; //轮廓点集
/*
vector<Point>: 这是一个动态数组,用于存储轮廓线上的点。
每个点都是一个 Point 对象,通常包含图像中某个轮廓线上的像素点的坐标。
vector<vector<Point>>: 这是一个二维向量,其中每个元素都是一个 vector<Point>。
这种结构允许你存储多个轮廓,每个轮廓由一系列点组成。
*/
vector<Vec4i> hierarchy;//轮廓层次结构
/*
Vec4i 是 OpenCV 中的一个模板类,用于存储四个整数值。
在轮廓处理中,每个 Vec4i 通常表示一个轮廓的四个点的索引,
这些索引指向一个更大的数组(通常是 vector<Point>),
该数组包含了实际的点坐标。
vector<Vec4i> 用来存储多个这样的 Vec4i 对象。
在轮廓检测中,一个图像可能包含多个轮廓,每个轮廓由多个点组成。
每个轮廓的点索引存储在一个 Vec4i 中,
而所有的轮廓则存储在 vector<Vec4i> 中。

层次结构 (hierarchy)
hierarchy 数组包含了轮廓之间的层次关系。
每个元素 Vec4i 包含四个值,分别表示:

Next:当前轮廓的下一个轮廓的索引(在 contours 中)。
Previous:当前轮廓的前一个轮廓的索引。
First Child:当前轮廓的第一个子轮廓的索引。
Parent:当前轮廓的父轮廓的索引。
这些信息可以用来理解轮廓之间的父子关系,
例如,哪些轮廓是另一个轮廓的子轮廓,或者哪些轮廓是兄弟轮廓。

这种层次结构信息在处理复杂的图像结构时非常有用,
比如在图像分割、对象识别和图像分析中。
*/

findContours(imgDil, contours, hierarchy, RETR_EXTERNAL, CHAIN_APPROX_SIMPLE); //通过预处理的二值图像找到所有轮廓contours
//drawContours(img, contours, -1, Scalar(255, 0, 255), 2); //绘制所有轮廓

for (int i = 0; i < contours.size(); i++)
{
double area = contourArea(contours[i]); //计算每个轮廓区域
cout << area << endl;

vector<vector<Point>> conPoly(contours.size());//大小与已检测到的轮廓数量相同。每个元素都是一个 vector<Point>,用于存储每个轮廓的多边形近似。
vector<Rect> boundRect(contours.size());//大小也与轮廓数量相同。每个元素是一个 Rect 对象,用于存储每个轮廓的边界矩形。
string objectType;

if (area > 1000) //过滤噪声
{
//找轮廓的近似多边形或曲线
double peri = arcLength(contours[i], true);
approxPolyDP(contours[i], conPoly[i], 0.02 * peri, true);

cout << conPoly[i].size() << endl;
boundRect[i] = boundingRect(conPoly[i]); //找每个近似曲线的最小上边界矩形

int objCor = (int)conPoly[i].size();//获取当前轮廓的顶点数。conPoly[i] 是第 i 个轮廓的多边形近似,size() 方法返回顶点的数量。

if (objCor == 3) { objectType = "Tri"; }//如果顶点数为3,那么对象被认为是一个三角形(Tri)。
if (objCor == 4) { //如果顶点数为4,进一步检查对象的宽高比来确定它是正方形还是矩形。

float aspRatio = (float)boundRect[i].width / boundRect[i].height; //宽高比
cout << aspRatio << endl;
if (aspRatio > 0.95 && aspRatio < 1.05) {
objectType = "Square";
}
else {
objectType = "Rect";
}
}
if (objCor > 4) { objectType = "CirCle"; }

drawContours(img, conPoly, i, Scalar(255, 0, 255), 2); //绘制滤除噪声后的所有轮廓
rectangle(img, boundRect[i].tl(), boundRect[i].br(), Scalar(0, 255, 0), 5); //绘制边界框
putText(img, objectType, { boundRect[i].x, boundRect[i].y - 5 }, FONT_HERSHEY_PLAIN, 1, Scalar(0, 69, 255), 1);
}
}
}

int main()
{
string path = "../lesson1_pictureRead/img1.jpg";
Mat img = imread(path);
Mat imgGray, imgBlur, imgCanny, imgDil;

// Preprocessing
cvtColor(img, imgGray, COLOR_BGR2GRAY);
GaussianBlur(imgGray, imgBlur, Size(3, 3), 3, 0);
Canny(imgBlur, imgCanny, 75, 125);
Mat kernel = getStructuringElement(MORPH_RECT, Size(3, 3));
dilate(imgCanny, imgDil, kernel);

getContours(imgDil, img);

namedWindow("Image",WINDOW_NORMAL);
imshow("Image", img);
/*imshow("Image Gray", imgGray);
imshow("Image Blur", imgBlur);
imshow("Image Canny", imgCanny);*/
imshow("Image Dil", imgDil);

waitKey(0);

return 0;
}


“觉得不错的话,给点打赏吧 ୧(๑•̀⌄•́๑)૭”

微信二维码

微信支付

支付宝二维码

支付宝支付

<opencv>第十一课 轮廓检测
https://hermione20.github.io/2024/10/14/第11课 轮廓检测/
作者
TC
发布于
2024年10月14日
许可协议